Here’s how to deal with your remote control robot vacuum’s sticky situation—when it’s played bumper cars with something far less glamorous than a dust bunny!
Learn how to rescue your robot vacuum from sticky situations like maple syrup, jam, or even dog poop with our easy cleaning guide. Simple and hilarious tips!
How to Clean Your Remote Control Robot Vacuum After It Behaves Like a Sticky Bandit
So, your obedient little robot vacuum has had an accidental run-in with something less than savory—let’s say, our sticky friend maple syrup, or perhaps a not-so chic splatter of jam. Maybe it’s a case of “don’t ask, don’t tell” with something dog-related. Whatever it is, don’t panic! Cleaning it up is easier than convincing your cat that you’re the boss. Here’s a comprehensive guide on how to rescue your robot vacuum from the sticky embrace of its latest encounter.
Step 1: Unplug and Power Down
First of all, safety first! Unplug that little gizmo and power it down. A robot vacuum that’s still on while you clean is like a toddler running around with scissors—everyone is at risk of a disaster. Give it a good night’s sleep while you prepare for round two.
Step 2: Inspect the Damage
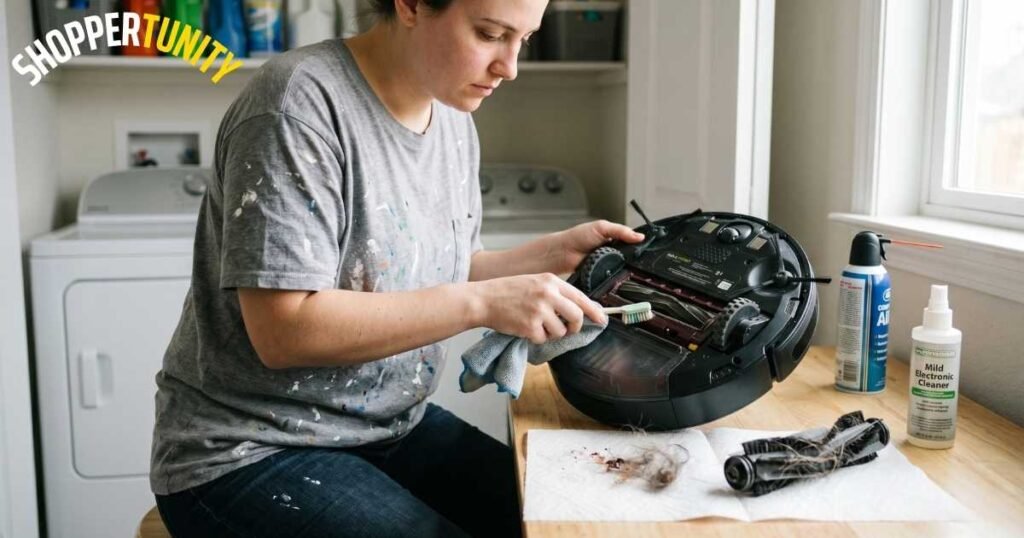
Now, let’s assess the situation like a detective from a crime drama. Inspect the wheels, brushes, and everything else that may have come into contact with the sticky mess. Is there a sticky layer on the sensors? A gloppy mass on the brushes? If so, you have a mission—Operation Clean-Up!
Step 3: Gather Your Tools
Time to channel your inner cleaning guru and gather your supplies:
- A soft, damp cloth (not too damp, we’re cleaning robots, not drowning them)
- Warm soapy water (anything that gets the job done; dish soap is a solid choice)
- A toothbrush or small brush (for those tight spots—think of it as flossing for your vacuum)
- A towel (for drying, not for throwing dramatically like you just scored an Oscar)
Step 4: Remove the Parts
Carefully detach the brushes and the dustbin. You’ll want to get to know your vacuum on a personal level at this point. If you’re feeling adventurous (and not overly attached), also remove the wheels for a thorough scrub—a little teamwork goes a long way!
Step 5: Wash the Brushes
Grab that warm, soapy concoction you’ve created and give those brushes a good soak. Use the toothbrush to get into those tricky areas. Remember: this isn’t a random Wednesday; it’s a spa day for your vacuum!
Step 6: Clean the Dustbin
Your dustbin has probably seen better days, particularly if it’s engaged in sticky warfare. Rinse it out under warm water. If there’s anything stubborn, the toothbrush will be your sidekick again. Now is a great time to reflect on what might have been in there and if you’ll ever be able to eat out of your plate again.
Step 7: Wipe Down the Main Body
Now, using the soft damp cloth, wipe down the body of the robot, ensuring to hit where the sensors live. These are the eyes of your vacuum, and we don’t want it turning into a malfunctioning blind bat.
Step 8: Let It Dry
Let everything dry properly. You don’t want your vacuum returning to its duties while still covered in suds. Think of it as letting a good wine breathe—it’ll work wonders. Pro tip: it won’t need its morning coffee; just dry it!
Step 9: Reassemble and Test
Once everything is dry, it’s game time! Reassemble the parts, give it a pep talk, and then plug it back in. After all that cleaning, it deserves to feel loved. Turn it on and see if it returns to cleaning its natural habitat—your floors.
Pros & Cons of Cleaning a Robot Vacuum
Just like a relationship, there are ups and downs:
Pros:
- Keeps your vacuum working like new.
- Prevents sticky situations (literally).
- Increases lifespan efficiency and performance.
Cons:
- Can get messy (good luck explaining that to the dog).
- Requires time and patience (not for the weak-willed).
- The possibility of finding a rogue pizza crust in your vacuum.
Verdict: Who is This For?
This cleaning guide is ideal for all robot vacuum owners who’ve discovered that these little cleaning machines can get into some sticky situations—literally! If you find yourself in a domestic disaster involving your beloved vacuum, you’re in the right place. Also great for people who overly enjoy grandchildren’s sticky fingers!
FAQ
Q1: How often should I clean my robot vacuum?
A1: Aim for once a month, or sooner if it’s seen a sticky battle. Regular maintenance can prevent costly repairs and ensure it keeps cruising around like a champ!
Q2: Can I use bleach to clean my robot vacuum?
A2: Please don’t! Bleach can damage not only your vacuum but your relationship with it. Stick to mild soap and warm water.
Q3: Will cleaning my robot vacuum void the warranty?
A3: Nah! As long as you’re not trying to artificially implant Wi-Fi in it while cleaning, you’re golden. Always check your warranty’s fine print just to be sure.
Now go forth and clean with confidence! Your robot vacuum will thank you, and your floors will be sparkling clean (eventually… no promises about the dog). Happy cleaning!